Archive for the ‘Marketing Tips’ Category
Writing tip: “Eat the big frog first”
What the heck does it mean to “eat the big frog first” – and what does it have to do with writing?
First, let’s look at this cryptic and confusing phrase!
Mark Twain said, “Eat a live frog first thing in the morning and nothing worse will happen to you the rest of the day.”
Over the past 100 years, this phrase has shifted to “eat the big frog first.” In other words, tackle the most challenging or dislikeable task first – or a big task that will produce your greatest results.

Photo by Patrice Rhoades-Baum
Now, let’s look at how you can “eat the big frog first” when writing articles, blog posts, or website content.
In this context, “eating the big frog first” means tackling the most difficult aspect of your writing project, right off the bat.
For example, if you’re creating all new content for your website, you would tackle the Home page copy first. This challenging chunk of copywriting can be difficult and daunting. Why?
Website Home page copy must:
- Convey your brand in a nutshell.
- Communicate your key benefit message.
- Be brief.
- Be on target (for your target market).
- Inspire the website visitor to keep reading, then contact you!
What if you don’t want to eat the big frog first?
Truth be told, I rarely eat the big frog first! I’ve been a professional copywriter for 30+ years. Often, I’ll start by writing smaller chunks of content. Editing a pile of testimonials. Compiling relevant notes to the project designer or developer. Later – when the creative juices are flowing – I’ll eat the big frog.
You can “nibble the little tadpoles first!”
Thanks to 2 recent conversations on this topic – with my client Debra and with my friend and marketing colleague Susan – we collectively coined the phrase, “nibble the little tadpoles first!”
Some people want to tackle the challenge right off the bat. These brave souls eat the big frog first. Meanwhile, some of us prefer to first nibble on little tadpoles to get the creative juices flowing.
Which approach is right for you?
There’s no right or wrong approach. As a professional copywriter, I encourage you to sink your teeth into your writing project and start by either eating big frogs or nibbling tadpoles.
One way or another, get started – and get that writing project done!
Read More...
SAVE THIS CHECKLIST: How to systematically review your new website before it goes live
Use this checklist to ensure a successful launch for your new (or updated) website!
 I’ve been a website marketing strategist, copywriter, and project manager “ever since Al Gore invented the Internet.”
Over the years, I’ve reviewed hundreds of business websites to ensure they were polished, professional, and working properly.
Before a website goes live – and immediately after – I thoroughly review the website. Top to bottom. Using my systematic approach.
Use this checklist to thoroughly review YOUR new or updated website. The goal, of course, is to successfully launch your new, polished, professional website, so you can happily share it with the world!
Here’s my 12-point checklist. Use it to review your new or updated website before it goes live AND after it goes live.
- Test all links – Click the across-the-top navigation to ensure every web page is linked appropriately. Next, scroll down to the footer and click all text links to ensure they’re set up correctly, including social media icons. And don’t forget the site map: open the site map web page and check every link. Next, systematically move from web page to web page testing every link: any text links in the body copy, videos, audios, PDF speaker one-sheet, PDF resume, and all graphical elements (e.g., logos). If the blog has categories and a FeedBurner type of email subscription, check these links as well. Finally, on the interior pages, try clicking on the company logo in the banner – this should take you back to the Home page.
- Complete all forms to ensure they work – Complete all opt-in boxes and contact forms. Put on the “customer hat” and experience the process from the website visitor’s point of view. If there’s a PDF giveaway on the Thank-You-For-Subscribing page (from the opt-in box), click the link. It’s shocking how often this is overlooked! In fact, thoroughly review these behind-the-scenes thank-you pages (developers call these “success pages”). Also, critically look at any Captcha-type spam-control plugin the developer may have added to your contact form. Personally, I find reCAPTCHA beyond frustrating. If you and your website developer decide your website needs a spam-control plugin, select a version that your target market can easily use. Imagine a qualified prospect taking the time to thoroughly complete your contact form, then throwing in the towel due to a frustrating experience, right when they’re ready to hit Submit – you won’t get that lead.
- Now try to BREAK all forms! – What happens if you don’t complete a required field, then hit Submit? Is the “error” dialog box helpful? Or is it cryptic and confusing? On the contact form, can you input a long European phone number in the phone field or does it only allow 10 characters for US and Canadian phone numbers? Spend time trying to “break” every opt-in box and contact form. If there are any issues, it’s best for YOU to find them, not your customers.
- Purchase your product – Whip out your credit card and purchase your book or downloadable product. Check to ensure all pricing and shipping information is correct. Put on the customer hat to experience the purchase from the website visitor’s point of view. Is the purchase and downloadable process easy? Did it work properly? Are all directions throughout the process clear and easy to understand? Jot down any errors – and possible points of confusion – and discuss these with your developer.
- Test all email addresses – Is the main email address on the website Info@ABCcompany.com? Are there other email addresses? Ensure all are properly set up. If they don’t work, you may lose email messages from qualified prospects.
- Test all other features/functionality – Does your website have a search function? Test it. Any other features or functionality? Test these thoroughly, wearing the customer hat.
- Proof every word – Typos slip in … it’s a fact of life. Weirdly, typos seem to “hide out” best in 24-point headlines! Here are my favorite tips to flush out lurking typos and sneaky grammar and punctuation errors. This is an important step to ensure your website meets your high standards of professionalism.
(A) Print every page and proof the old-fashioned way – on paper. This simple trick offers a surprising level of objectivity and is much more effective than proofing at the monitor.
(B) Ask a family member, friend, or colleague to proof your website copy for you. Choose someone who has this skillset.
(C) Hire a professional proofreader.
~~~
~~~ - Critically examine stock photos – If the developer used stock photos in your new website, are the images fresh or trite? Do the images support your message? Ask pointed questions of your developer to ensure you have purchased the rights to use all stock photos and clipart. Finally, you’ll want to ensure photos with people present a mix of male/female, various ethnicities and, depending on your target market, different age groups.
- Check all redirects – For example, if your website address is ParagonConsulting.com and you requested that your developer redirect ParagonCoaching.com, then you’ll want to ensure this is set up.
- Ensure your developer has implemented basic SEO strategies – Like a well, this is a deep subject, given the plethora of SEO strategies and philosophies. At minimum, ensure your developer added a unique meta title and meta description for each web page and incorporated important organic keywords.
- Review using different browsers and multiple mobile devices (both Apple and Android) – Yikes, this is the bane of every website developer – and reviewers! This task can be time-consuming, and many developers do not conduct a thorough review. However, it’s YOUR website so, ultimately, it’s YOUR responsibility. At the time of this writing, there are 5 major browsers: Google Chrome, Mozilla Firefox, Internet Explorer, Safari, and Opera. Download each browser onto your computer and test the key features and functionality of your website on every browser (especially email and contact form). Yes, it’s a pain, but this is vitally important. And take time to review your new website on a variety of mobile devices – both Apple and Android. I recently found a significant issue when reviewing a client’s new website on my Android smartphone – an issue he didn’t encounter on his iPhone.
SIDE NOTE: As of December 2014, W3Schools.com listed the most popular browsers (in terms of market share) as:
- Google Chrome: 61.36%
- Mozilla Firefox: 23.6%
- Internet Explorer: 8.0%
- Safari: 3.7%
- Opera: 1.6%
- What’s missing? – I’ve done a ton of professional editing in my career. Long ago, this realization popped into my head regarding the difference between a proofreader and an editor: The proofreader looks at what IS there; the editor also looks at what is NOT there. Step up to the 10,000-foot level and ask yourself: “Is anything missing? Are all photos, videos, and other assets represented in my new website, as planned? Is the contact form robust, so it serves as a hardworking inquiry form? Have we overlooked anything?”
If you have thoroughly reviewed your new or updated website – using this checklist and a systematic approach – then you’re ready to go live. Congratulations!
Read More...
Marketing & Branding Views: Humility vs. self-promotion
THEME: “Humility vs. Self-Promotion” (Marketing Tip for Solopreneurs)
TIME: 3 minutes
LOCATION: Downtown Colorado Springs
THE KEY VIEWPOINT: I joined Katharine Lee Bates – who penned “America the Beautiful” in 1893 after summiting Pikes Peak by wagon and mule – to chat about this topic. :> Ironically, while we prize humility as a personal trait, you don’t want to be TOO humble when promoting yourself and your business. Here are marketing tips for solopreneurs to overcome 3 common stumbling blocks to forge a powerful brand and promote your business – without feeling like it’s shameless self-promotion!
Read More...
How to run a paperless office
Yikes, being a solopreneur is a juggling act. Seems we have to squeeze in client projects (actual paying work) between proposals, marketing projects, and accounting tasks.
Before we know it, our office is overflowing in files. And why does it always seem like the specific piece of information we need is at the bottom of our “horizontal filing system”? Ack!
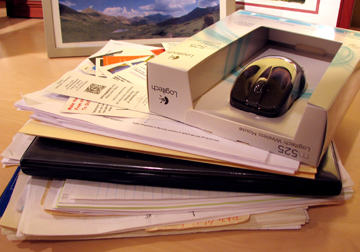
An example of what I call “horizontal filing.”
Overall, I tend to be extremely organized. But 2014 was crazy-busy, and my office reflected it.
Starting January 1, I gave myself the gift of organization. I put “cleaning, filing, and organizing” on my priority list. Like Larry the Cable Guy says, it was time to get ‘er done!
Here are a few of my favorite tips to run a paperless office (and increase efficiency and productivity).
- Type notes versus scribbling on scraps of paper – If you’re on the phone and need to take notes, don’t scribble on a piece of paper that would need to be filed later. Instead, open an MS Word document (or other note-taking document) and type your notes. Get a good-quality, comfortable headset.
- Scan paper notes & business cards from networking events – If you do have paper notes or a stack of biz cards, scan them and file them in folders on your computer. Then toss the paper.
- Use sticky notes judiciously – I once worked with a guy who wallpapered his desk with sticky notes, plus they encircled his monitor. That would drive me crazy.
- Only touch a piece of paper once – Waay back in the ’80s – in my first time-management class – the instructor gave us this advice: When you pick up a piece of paper, you handle the matter or you file or toss the paper. This rule may feel like old news, but try applying it to your email in-box. It works!
- If your filing cabinet is full, it’s time to toss stuff out – As I conquered my “horizontal filing” stack in the photo above, I realized a big issue was space. While many papers in the stack were out of date and could be tossed, a few key items needed to be filed. I ended up cleaning out 3 file cabinet drawers, then had a shredding party.
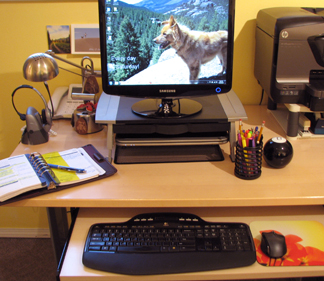
This is my desk — an almost paperless office.
I should revise this article’s headline to:
“How to run an ALMOST paperless office.”
Why? Because my favorite strategy for keeping a paperless office is using an organization system.
I’ve put systems into place to tie my electronic calendar (Outlook) to action items in my paper-based Franklin Planner. Over the decades, I’ve cobbled together a one-of-a-kind system that’s virtually foolproof.
In fact, my NSA/Colorado Programming Committee “partner in crime” Traci Brown has commented several times that she likes to think she stays one step ahead of others – and that I’m always 2 steps ahead of her! [blush] :>
I’m not sure that’s always true, but I do like to run an efficient office. And now that my “horizontal filing” stack is gone, it’s an ALMOST paperless office.
~~~~~~~~~~~~~~~~~~~~~~~~~
BONUS Time-Management Tip:
The end-of-day brain dump
 At the end of every workday, organize and write down all action items, project notes, meetings, and reminders for the next day. You can do this in your time-management system (paper or electronic) or, at minimum, on a to-do list.
Allow at least 10 minutes – more if you have lots of irons in the fire. Sometimes this takes me 30 minutes!
Next, prioritize your list.
The result? The next morning, you’re super-organized the minute you walk into your office.
The icing on the cake? You get a good night’s sleep! No more waking up at 2am, remembering stray pieces of information, then “working” all night.
Read More...
Marketing & Branding Views: “Referrals are golden”
THEME: “Referrals are Golden”
TIME: 2 minutes
LOCATION: Catamount Open Space, north slope of Pikes Peak
THE KEY VIEWPOINT: To grow your business, it’s important to stay top-of-mind with your referral partners (those who refer clients to you). Here are specific ideas to nurture your referral network – and even formalize and up-level your referral program.
CLICK HERE to read the transcript
The following photos by Patrice Rhoades-Baum


Read More...
Marketing & Branding Views: Use the “Itch-and-Scratch” approach to write your marketing copy
THEME: Use the “Itch-and-Scratch” approach to write marketing copy
TIME: 2 minutes
LOCATION: Red Rock Canyon Open Space, Colorado Springs, Colorado
THE KEY VIEWPOINT: Use the time-tested and proven Itch-and-Scratch approach to write your marketing copy – especially website copy. And see what poison ivy looks like – remember, “leaves of three, let it be!”
CLICK HERE to read the transcript.
Read More...
WIFM drives all your marketing activities, including branding your business
Tip: Read the following with an announcer’s voice:
Your clients are always tuned in to radio station WIFM: “What’s In it For Me?”
Over 3 decades ago, I received this timeless marketing advice — the single most important advice in my marketing career.
In marketing, WIFM is your touchstone. Do not lose sight of this.
When I presented my “Nail Your Brand!” workshop for NSA’s Colorado Speakers Academy a few weeks ago, we started the workshop by discussing, and underscoring, the importance of WIFM in all aspects of marketing your business.
Obviously, you use a WIFM approach in advertisements. Plus, it’s the approach to use for website copy, your speaker one-sheet or company brochure, and even your brand.
When clarifying your brand, it’s important to communicate who you are and what you do. And it’s critical to convey what THEY get — the benefits and results your clients, customers, and audience members receive.
No matter what type of marketing activity you’re working on, including clarifying the brand for your small business, keep this in mind: Your clients are always listening to radio station WIFM: “What’s In it For Me?”